Over the last couple weeks, the question has come up several times "what can I do to preserve the large amount of data that I have?" Well, that is why I'm writing this. There are several ways to handle servers with large amounts of data.
Solution 1:
Manual transfer (nobody has time for that!)
Solution 2:
Fix the issues if possible, or work around them (nobody has time for that either!)
Solution 3: (my personal favorite)??
Method A:
Method B:
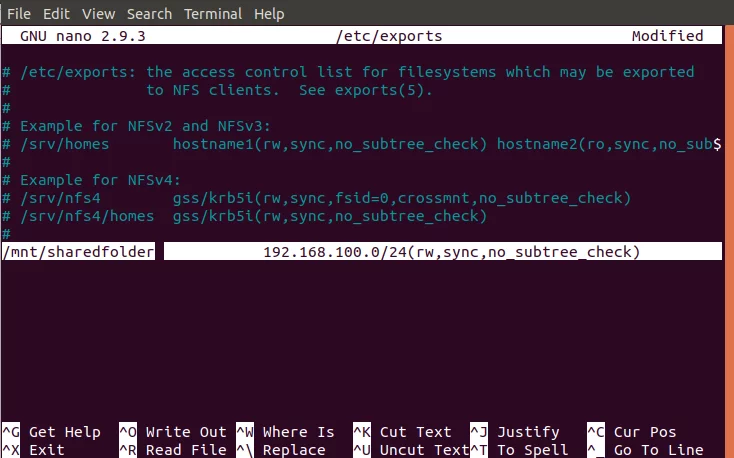
In this example, we are specifying an entire subnet of all the clients we want to grant access to our export folder (sharedfolder):

Add the required line(s) to your exports file and then save it by hitting Ctrl+X, entering Y, and then hitting Enter.
The permissions “rw,sync,no_subtree_check” permissions defined in this file mean that the client(s) can perform:
After making all the above configurations in the host system, now is the time to export the shared directory through the following command as sudo:
Finally, in order to make all the configurations take effect, restart the NFS Kernel server as follows:

Step 5: Open firewall for the client (s)
An important step is to verify that the server’s firewall is open to the clients so that they can access the shared content. The following command will configure the firewall to give access to clients through NFS:

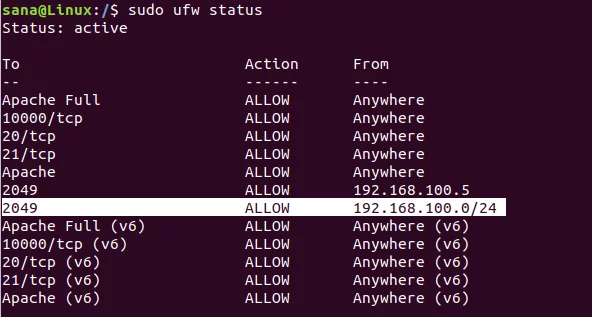
Now when you check the status of your Ubuntu firewall through the following command, you will be able to view the Action status as “Allow” for the client’s IP.

Your host server is now ready to export the shared folder to the specified client(s) through the NFS Kernel Server.
Configuring the Client Machine
Now is the time to make some simple configurations to the client machine, so that the shared folder from the host can be mounted to the client and then accessed smoothly.
Step 1: Install NFS Common
Before installing the NFS Common application, we need to update our system’s repository index with that of the Internet through the following apt command as sudo:
Run the following command in order to install the NFS Common client on your system:

The system will prompt you with a Y/n option to confirm if you want to continue with the installation. Please enter Y and then hit Enter to continue, after which the software will be successfully installed on your system.
Step 2: Create a mount point for the NFS host’s shared folder
Your client’s system needs a directory where all the content shared by the host server in the export folder can be accessed. You can create this folder anywhere on your system. We are creating a mount folder in the mnt directory of our client’s machine:

Step 3: Mount the shared directory on the client
The folder that you created in the above step is like any other folder on your system unless you mount the shared directory from your host to this newly created folder.
Use the following command in order to mount the shared folder from the host to a mount folder on the client:
In our example, we are running the following command to export our “sharedfolder” from the server to the mount folder “sharedfolder_client” on the client machine:
Step 4: Test the connection
Please create or save a file in the export folder of the NFS host server. Now, open the mount folder on the client machine; you should be able to view the same file shared and accessible in this folder.
Conclusion
As you can see, there IS more than one way to preserve large amounts of data on a system.
Stay tuned to my next post.
Sources:
https://askubuntu.com/questions/412477/mount-remote-directory-using-ssh
https://www.linode.com/docs/networking/ssh/using-sshfs-on-linux/
https://coderwall.com/p/zras0a/mount-remote-ssh-directory-in-ubuntu
https://www.linode.com/docs/networking/nfs/how-to-mount-nfs-shares-on-debian-9/
https://vitux.com/install-nfs-server-and-client-on-ubuntu/
https://www.digitalocean.com/community/tutorials/how-to-set-up-an-nfs-mount-on-ubuntu-18-04
https://www.digitalocean.com/community/tutorials/how-to-use-sshfs-to-mount-remote-file-systems-over-ssh
And the friend who reminded me about NFS ? ? ?
?
Solution 1:
Manual transfer (nobody has time for that!)
Solution 2:
Fix the issues if possible, or work around them (nobody has time for that either!)
Solution 3: (my personal favorite)??
Re-purpose the server!
"What's that you say? Re-purpose it?" YES!
What I mean by this is, what was once a multipurpose server, make it dedicated file server!
"How," you may ask.
Well there's couple different ways to approach this..........
"What's that you say? Re-purpose it?" YES!
What I mean by this is, what was once a multipurpose server, make it dedicated file server!
"How," you may ask.
Well there's couple different ways to approach this..........
Method A:
sshfs
Configure ssh key-based authentication
Generate key pair on the local host. **ADVANCED**
Accept all suggestions with enter key.
Copy public key to the remote host:
Mount remote directory
Don't try to add remote fs to /etc/fstab!!!
Or don't try to mount shares via /etc/rc.local !!
In both cases it won't work as the network is not available when init reads /etc/fstab.
Install AutoFS
Edit /etc/auto.master
Comment out the following lines
Add a new line
Save and quit
Edit /etc/auto.sshfs
Add a new line
Remote user name is obligatory.
Save and quit
Start autofs in debug mode
Observe logs of the remote ssh server
Check content of the local directory
You should see contents of the remote directory
Start autofs in normal mode
Stop AutoFS running in debug mode with CTRL-C .
Start AutoFS in normal mode
Enjoy
Configure ssh key-based authentication
Generate key pair on the local host. **ADVANCED**
Code:
ssh-keygen -t rsaAccept all suggestions with enter key.
Copy public key to the remote host:
Code:
ssh-copy-id -i .ssh/id_rsa.pub user@host[CODE]

Install sshfs

[CODE]sudo apt install sshfs
Mount remote directory
Code:
sshfs user@host:/remote_directory /local_directoryDon't try to add remote fs to /etc/fstab!!!
Or don't try to mount shares via /etc/rc.local !!
In both cases it won't work as the network is not available when init reads /etc/fstab.
Install AutoFS
Code:
sudo apt install autofsEdit /etc/auto.master
Comment out the following lines
Code:
#+/etc/auto.master.d
#+/etc/auto.master
Code:
/- /etc/auto.sshfs --timeout=30Save and quit
Edit /etc/auto.sshfs
Add a new line
Code:
/local_directory -fstype=fuse,allow_other,IdentityFile=/local_private_key :sshfs\#user@remote_host\:/remote_directoryRemote user name is obligatory.
Save and quit
Start autofs in debug mode
Code:
sudo service autofs stop
Code:
sudo automount -vfObserve logs of the remote ssh server
Code:
ssh user@remote_server
Code:
sudo tailf /var/log/secureCheck content of the local directory
You should see contents of the remote directory
Start autofs in normal mode
Stop AutoFS running in debug mode with CTRL-C .
Start AutoFS in normal mode
Code:
sudo service autofs startEnjoy
Method B:
NFS
Setting up the host server
In order to set up the host system to share directories, we will need to install the NFS Kernel server on it, and then create and export the directories that we want the client systems to access. Please follow these steps in order to smoothly set up the host side:
Step 1: Install NFS Kernel Server
Before installing the NFS Kernel server, we need to update our system’s repository index with that of the Internet through the following apt command as sudo:
The above command lets us install the latest available version of a software through the Ubuntu repositories.
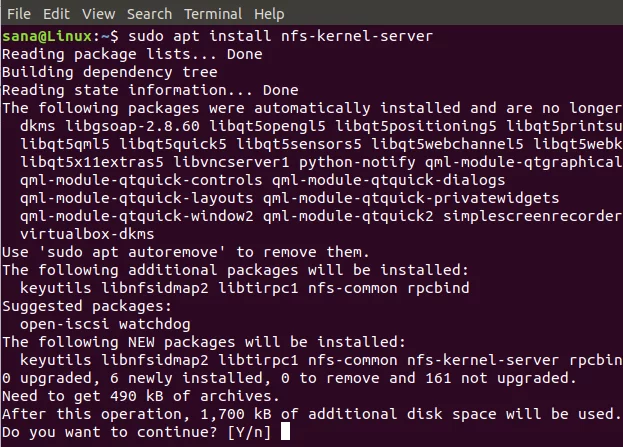
Now, run the following command in order to install the NFS Kernel Server on your system:

The system will prompt you with a Y/n option to confirm if you want to continue with the installation. Please enter Y and then hit Enter to continue, after which the software will be successfully installed on your system.
Step 2: Create the Export Directory
The directory that we want to share with the client system is called an export directory. You can name it according to your choice; here, we are creating an export directory by the name of “sharedfolder” in our system’s mnt(mount) directory.
Use the following command, by specifying a mount folder name according to your need, through the following command as root:

As we want to have full access the directory, we will change permissions of the export folder through the following commands:
Now all users from all groups on the client system will be able to access our “sharedfolder”.

You can create as many sub-folders in the export folder as you want, for the client to access.
Step 3: Assign server access to client(s) through NFS export file
After creating the export folder, we will need to provide the clients the permission to access the host server machine. This permission is defined through the exports file located in your system’s /etc folder. Please use the following command in order to open this file through the Nano editor:
Editing this file needs root access; therefore you will need to use
Once you have opened the file, you can allow access to:
Setting up the host server
In order to set up the host system to share directories, we will need to install the NFS Kernel server on it, and then create and export the directories that we want the client systems to access. Please follow these steps in order to smoothly set up the host side:
Step 1: Install NFS Kernel Server
Before installing the NFS Kernel server, we need to update our system’s repository index with that of the Internet through the following apt command as sudo:
Code:
sudo apt-get updateNow, run the following command in order to install the NFS Kernel Server on your system:
Code:
sudo apt install nfs-kernel-server
The system will prompt you with a Y/n option to confirm if you want to continue with the installation. Please enter Y and then hit Enter to continue, after which the software will be successfully installed on your system.
Step 2: Create the Export Directory
The directory that we want to share with the client system is called an export directory. You can name it according to your choice; here, we are creating an export directory by the name of “sharedfolder” in our system’s mnt(mount) directory.
Use the following command, by specifying a mount folder name according to your need, through the following command as root:
Code:
sudo mkdir -p /mnt/sharedfolder
As we want to have full access the directory, we will change permissions of the export folder through the following commands:
Code:
sudo chown nobody:nogroup /mnt/sharedfolder
Code:
sudo chmod 777 /mnt/sharedfolderNow all users from all groups on the client system will be able to access our “sharedfolder”.

You can create as many sub-folders in the export folder as you want, for the client to access.
Step 3: Assign server access to client(s) through NFS export file
After creating the export folder, we will need to provide the clients the permission to access the host server machine. This permission is defined through the exports file located in your system’s /etc folder. Please use the following command in order to open this file through the Nano editor:
Code:
sudo nano /etc/exportsEditing this file needs root access; therefore you will need to use
sudo with your command. You can also open the file in any of your personal favorite text editors.Once you have opened the file, you can allow access to:
- A single client by adding the following line in the file:
Code:
/mnt/sharedfolder clientIP (rw,sync,no_subtree_check)- Multiple clients by adding the following lines in the file:
Code:
/mnt/sharedfolder client1IP (rw,sync,no_subtree_check)
Code:
/mnt/sharedfolder client2IP (rw,sync,no_subtree_check)- Multiple clients, by specifying an entire subnet that the clients belong to:
Code:
/mnt/sharedfolder subnetIP/24 (rw,sync,no_subtree_check)In this example, we are specifying an entire subnet of all the clients we want to grant access to our export folder (sharedfolder):

Add the required line(s) to your exports file and then save it by hitting Ctrl+X, entering Y, and then hitting Enter.
The permissions “rw,sync,no_subtree_check” permissions defined in this file mean that the client(s) can perform:
- rw: read and write operations
- sync: write any change to the disc before applying it
- no_subtree_check: prevent subtree checking
After making all the above configurations in the host system, now is the time to export the shared directory through the following command as sudo:
Code:
sudo exportfs -a
Code:
sudo systemctl restart nfs-kernel-server
Step 5: Open firewall for the client (s)
An important step is to verify that the server’s firewall is open to the clients so that they can access the shared content. The following command will configure the firewall to give access to clients through NFS:
Code:
sudo ufw allow from [clientIP or clientSubnetIP] to any port nfs[ICODE]
In our example, we are giving access to an entire subnet of clients machines through the following command:

[CODE]sudo ufw allow from 192.168.100/24 to any port nfs
Now when you check the status of your Ubuntu firewall through the following command, you will be able to view the Action status as “Allow” for the client’s IP.
Code:
sudo ufw status
Your host server is now ready to export the shared folder to the specified client(s) through the NFS Kernel Server.
Configuring the Client Machine
Now is the time to make some simple configurations to the client machine, so that the shared folder from the host can be mounted to the client and then accessed smoothly.
Step 1: Install NFS Common
Before installing the NFS Common application, we need to update our system’s repository index with that of the Internet through the following apt command as sudo:
Run the following command in order to install the NFS Common client on your system:
Code:
sudo apt-get install nfs-common
The system will prompt you with a Y/n option to confirm if you want to continue with the installation. Please enter Y and then hit Enter to continue, after which the software will be successfully installed on your system.
Step 2: Create a mount point for the NFS host’s shared folder
Your client’s system needs a directory where all the content shared by the host server in the export folder can be accessed. You can create this folder anywhere on your system. We are creating a mount folder in the mnt directory of our client’s machine:
Code:
sudo mkdir -p /mnt/sharedfolder_client
Step 3: Mount the shared directory on the client
The folder that you created in the above step is like any other folder on your system unless you mount the shared directory from your host to this newly created folder.
Use the following command in order to mount the shared folder from the host to a mount folder on the client:
Code:
sudo mount serverIP:/exportFolder_server /mnt/mountfolder_clientIn our example, we are running the following command to export our “sharedfolder” from the server to the mount folder “sharedfolder_client” on the client machine:
Code:
sudo mount 192.168.100.5:/mnt/sharedfolder /mnt/sharedfolder_clientPlease create or save a file in the export folder of the NFS host server. Now, open the mount folder on the client machine; you should be able to view the same file shared and accessible in this folder.
As you can see, there IS more than one way to preserve large amounts of data on a system.
Stay tuned to my next post.
Sources:
https://askubuntu.com/questions/412477/mount-remote-directory-using-ssh
https://www.linode.com/docs/networking/ssh/using-sshfs-on-linux/
https://coderwall.com/p/zras0a/mount-remote-ssh-directory-in-ubuntu
https://www.linode.com/docs/networking/nfs/how-to-mount-nfs-shares-on-debian-9/
https://vitux.com/install-nfs-server-and-client-on-ubuntu/
https://www.digitalocean.com/community/tutorials/how-to-set-up-an-nfs-mount-on-ubuntu-18-04
https://www.digitalocean.com/community/tutorials/how-to-use-sshfs-to-mount-remote-file-systems-over-ssh
And the friend who reminded me about NFS ? ?
Last edited:


