This is a basic and simple tutorial to stream your own channel to the world using HLS streaming (.m3u8), using my own recent experience.
In this case I'll be using one computer (in my home) to generate the source using VLC and other (Cloud VM) as server to distribute the content, due to low bandwidth in the generator side,
I'm using Debian GNU/Linux 10 as example in the server side, but you can adapt to use in any other OS. I'm presuming who will use this tutorial already know at least the basics of Debian (or Ubuntu) and VLC. Check the local and server machine have full access to the internet and the desired ports open and forwarded, in this example I'm using HTTP port (80) in the web server and 30000 port in my home.
Firts, install Apache 2 HTTP server and FFMPEG in your Debian server side
Now start the apache 2 server, go to your server http root, create a subfolder folder that we'll use for stream your live channel, make permissions.
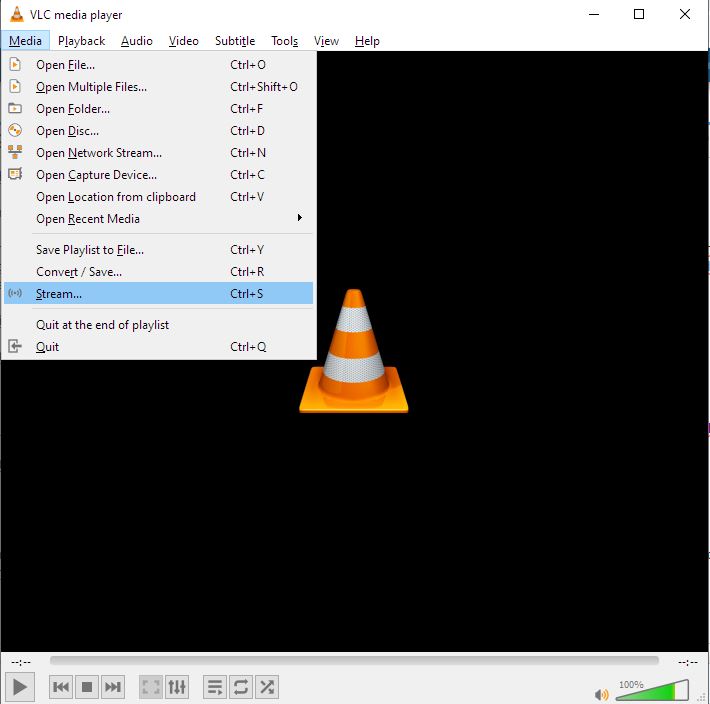
Install VLC in your home computer (I'm using Windows here) and open it, Go to Media > Stream
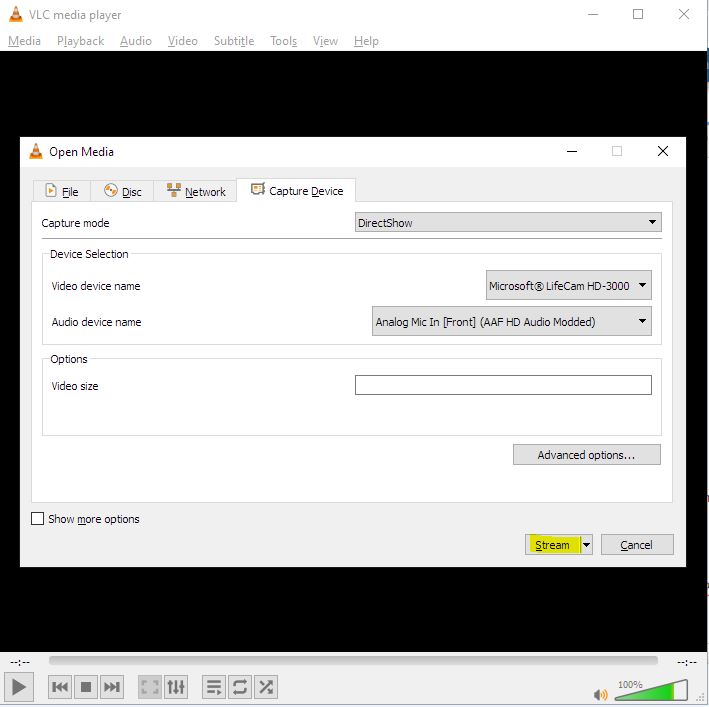
You can use capture devices like Webcam, Tuner Card, Network source, local file, or a Disc devices. I'm using my webcam in Windows side in this tutorial.
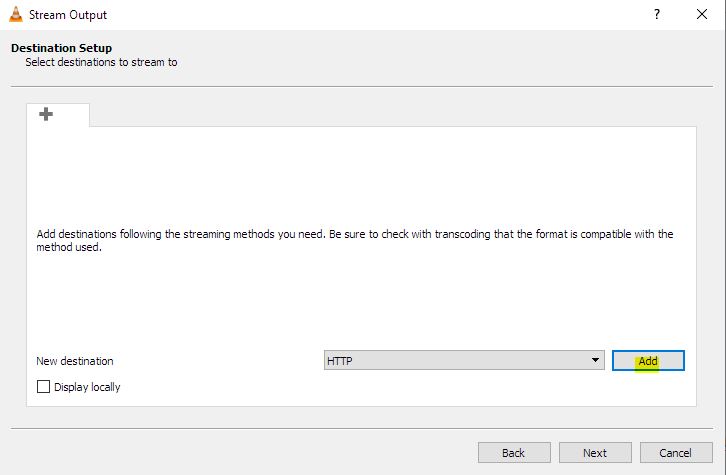
Press Next in the source and when in Destination Setup screen select HTTP and click on Add
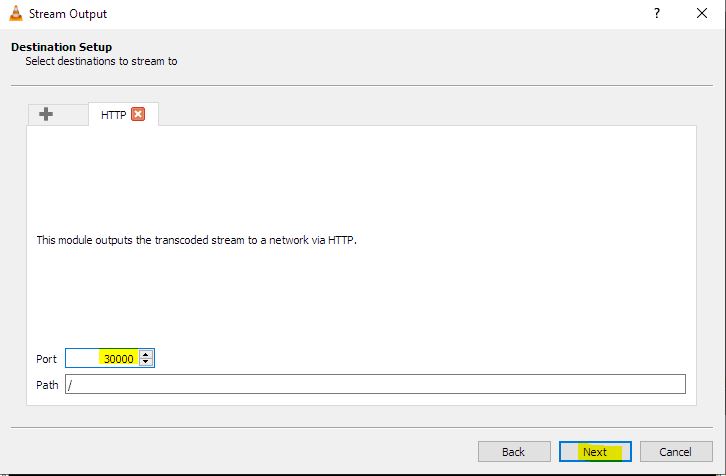
I'd changed the port to 30000 because my ISP blocks to serve lower ports usage.
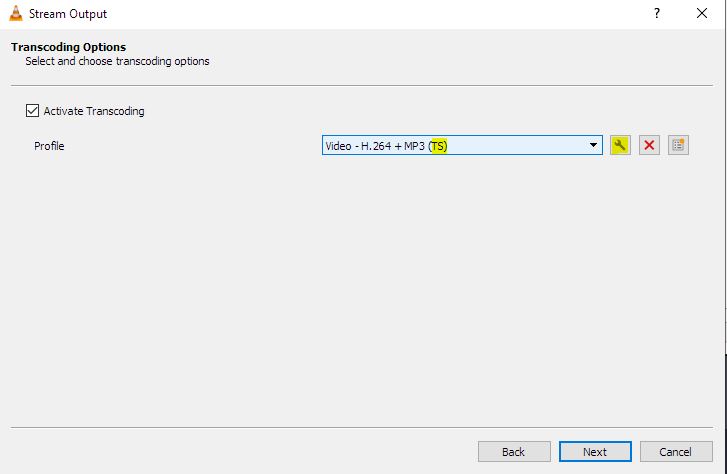
Change the profile to H.264 + MP3 TS and click in the tool icon
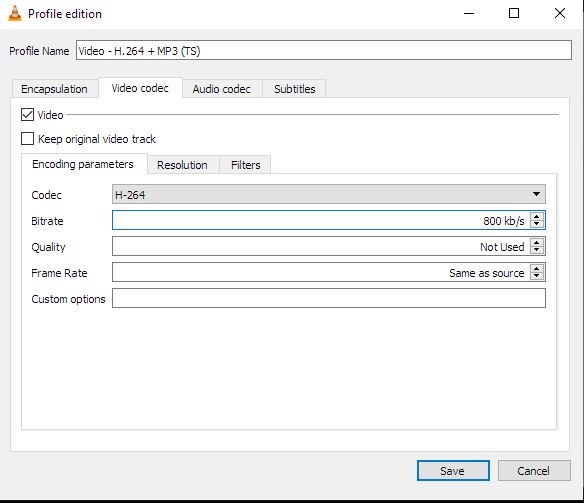
Use H.264 as default video codec with desired bitrate
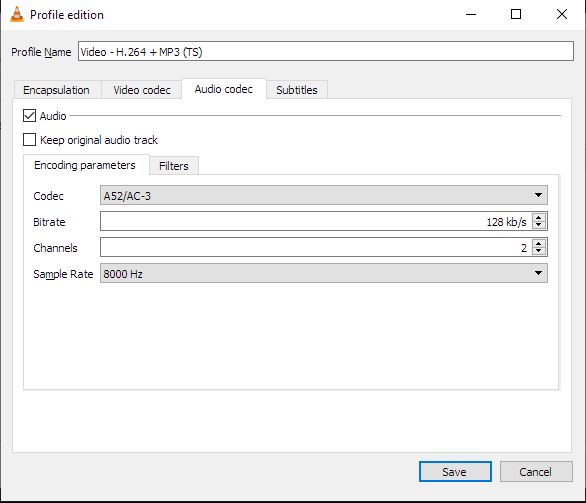
Use AC3 as default audio codec with desired bitrate, "Save"
click on "Next" and on "Stream".
Check your Home PC address to the internet, in this example I'll use 123.45.67.89 , If your PC is behind a NAT, forward the port in your router to your PC.
Get back to the server and run the FFMPEG to re-stream your content in HLS format:
As the FFMPEG is not encoding in this example, just restreaming the content, there is no extra CPU usage.
Now you can access the URL from your server in your browser, in the example I'll use 198.76.54.32 as the server IP
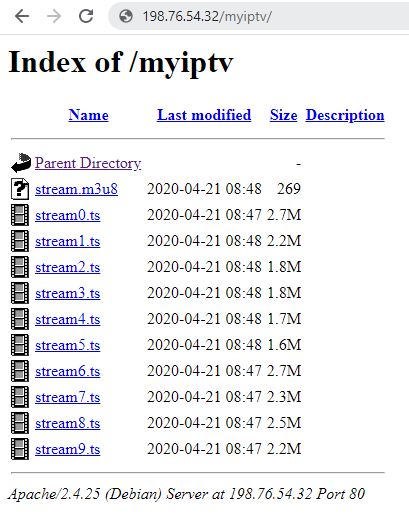
Now it's running and UP! Now you are able to share your HLS URL "http://198.76.54.32/myiptv/stream.m3u8" with the world!
After this you can learn more about FFMPEG and how to use some of your hardware features to decode and use less CPU, stream more substreams, etc... how to configure other Apache2 features and automatize your server side to run the FFMPEG when start and try to reconnect when have disconnection.
In this case I'll be using one computer (in my home) to generate the source using VLC and other (Cloud VM) as server to distribute the content, due to low bandwidth in the generator side,
I'm using Debian GNU/Linux 10 as example in the server side, but you can adapt to use in any other OS. I'm presuming who will use this tutorial already know at least the basics of Debian (or Ubuntu) and VLC. Check the local and server machine have full access to the internet and the desired ports open and forwarded, in this example I'm using HTTP port (80) in the web server and 30000 port in my home.
Firts, install Apache 2 HTTP server and FFMPEG in your Debian server side
$ sudo su
# apt update
# apt install apache2 ffmpeg
Now start the apache 2 server, go to your server http root, create a subfolder folder that we'll use for stream your live channel, make permissions.
# service apache2 start
# cd /var/www/html
# mkdir myiptv
# chmod 775 myiptv -R
Install VLC in your home computer (I'm using Windows here) and open it, Go to Media > Stream
You can use capture devices like Webcam, Tuner Card, Network source, local file, or a Disc devices. I'm using my webcam in Windows side in this tutorial.
Press Next in the source and when in Destination Setup screen select HTTP and click on Add
I'd changed the port to 30000 because my ISP blocks to serve lower ports usage.
Change the profile to H.264 + MP3 TS and click in the tool icon
Use H.264 as default video codec with desired bitrate
Use AC3 as default audio codec with desired bitrate, "Save"
click on "Next" and on "Stream".
Check your Home PC address to the internet, in this example I'll use 123.45.67.89 , If your PC is behind a NAT, forward the port in your router to your PC.
Get back to the server and run the FFMPEG to re-stream your content in HLS format:
$ ffmpeg -i http://123.45.67.89:30000 -c:v copy -c:a copy -f hls -hls_time 10 -hls_list_size 6 -hls_wrap 10 /var/www/html/myiptv/stream.m3u8As the FFMPEG is not encoding in this example, just restreaming the content, there is no extra CPU usage.
Now you can access the URL from your server in your browser, in the example I'll use 198.76.54.32 as the server IP
Now it's running and UP! Now you are able to share your HLS URL "http://198.76.54.32/myiptv/stream.m3u8" with the world!
After this you can learn more about FFMPEG and how to use some of your hardware features to decode and use less CPU, stream more substreams, etc... how to configure other Apache2 features and automatize your server side to run the FFMPEG when start and try to reconnect when have disconnection.
Last edited: